What are VRF import/export maps and why to use it?
VRFs are an excellent tool for maintaining segregated routing topologies for separate customers or services. However, what if you needed to export only a subset of routes within a VRF? Inter-VRF routing using route targets along with BGP are the mechanisms to facilitate this. This kind of design is generally seen with a hub-spoke kind of topology but with route filtering to prevent full mesh and keep specific traffic or networks separate.
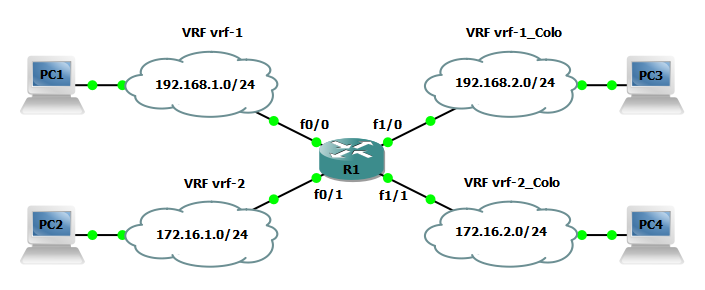
In the network below we have one router with four separate VRFs. Each VRF will be its own segregated network but will receive a subset of routes from other VRFs. In this example vrf-1, vrf-1_Colo, and vrf-2_Colo will share routes. Additionally vrf-2, vrf-1_Colo, and vrf-2_Colo will also share routes. The VRFs vrf-1 and vrf-2 will not share routing information and should not be permitted to speak to one another. Similarly all traffic and networks not part of any of the VRFs would also remain segregated.

Steps to configure VRFs
R1(config)#ip vrf vrf-1
R1(config-vrf)#rd 65000:1001
R1(config-vrf)#route-target export 65000:1001
R1(config-vrf)#route-target import 65000:1001
!
R1(config)#ip vrf vrf-1_Colo
R1(config-vrf)#rd 65000:2001
R1(config-vrf)#route-target export 65000:2001
R1(config-vrf)#route-target import 65000:2001
!
R1(config)#ip vrf vrf-2
R1(config-vrf)#rd 65000:1002
R1(config-vrf)#route-target export 65000:1002
R1(config-vrf)#route-target import 65000:1002
!
R1(config)#ip vrf vrf-2_Colo
R1(config-vrf)#rd 65000:2002
R1(config-vrf)#route-target export 65000:2002
R1(config-vrf)#route-target import 65000:2002
Step 2: Create two more VRFs named Services1 and Services2. The VRFs Services1 and Services1 will only be used for the purpose of exporting and importing routes between other VRFs. Again specify a target VPN extended community with the route-target command, a route distinguisher, and mark the target VPN community as both exportable and importable.
R1(config)#ip vrf Services1
R1(config-vrf)#rd 65000:101
R1(config-vrf)#route-target export 65000:101
R1(config-vrf)#route-target import 65000:101
!
R1(config)#ip vrf Services2
R1(config-vrf)#rd 65000:102
R1(config-vrf)#route-target export 65000:102
R1(config-vrf)#route-target import 65000:102
Step 3: Assign the vrf-1 to FastEthernet0/0 and FastEthernet1/0.
R1(config)#interface FastEthernet0/0
R1(config-if)#ip vrf forwarding vrf-1
!
R1(config)#interface FastEthernet1/0
R1(config-if)#ip vrf forwarding vrf-1
Step 4: Assign the vrf-2 to FastEthernet0/1 and FastEthernet1/1.
R1(config)#interface FastEthernet0/1
R1(config-if)#ip vrf forwarding vrf-2
!
R1(config)#interface FastEthernet1/1
R1(config-if)#ip vrf forwarding vrf-2
Step 5: Configure a IP address all applicable router interfaces.
R1(config)#interface FastEthernet0/0
R1(config-if)#ip address 192.168.1.1 255.255.255.0
!
R1(config)#interface FastEthernet0/1
R1(config-if)#ip address 172.16.1.1 255.255.255.0
!
R1(config)#interface FastEthernet1/0
R1(config-if)#ip address 192.168.2.1 255.255.255.0
!
R1(config)#interface FastEthernet1/1
R1(config-if)#ip address 172.16.2.1 255.255.255.0
NOTE: You must configure IP addressing on an interface after a VRF is assigned to the interface. Adding or removing a VRF from an interface will remove all IP addressing from the interface to which the VRF was added or removed.
Configure a BGP process
R1(config)#router bgp 65000
!
R1(config-router)#address-family ipv4 vrf Services1
!
R1(config-router)#address-family ipv4 vrf Services2
!
R1(config-router)#address-family ipv4 vrf vrf-2_Colo
R1(config-router-af)#network 172.16.2.0 mask 255.255.255.0
!
R1(config-router)#address-family ipv4 vrf vrf-2
R1(config-router-af)#network 172.16.1.0 mask 255.255.255.0
!
R1(config-router)#address-family ipv4 vrf vrf-1_Colo
R1(config-router-af)#network 192.168.2.0 mask 255.255.255.0
!
R1(config-router)#address-family ipv4 vrf vrf-1
R1(config-router-af)#network 192.168.1.0 mask 255.255.255.0
Steps to configure import/export maps
R1(config)#ip vrf vrf-1
R1(config-vrf)#route-target import 65000:101
R1(config-vrf)#route-target export 65000:101
!
R1(config)#ip vrf vrf-1_Colo
R1(config-vrf)#route-target import 65000:101
R1(config-vrf)#route-target export 65000:101
!
R1(config)#ip vrf vrf-2_Colo
R1(config-vrf)#route-target import 65000:101
R1(config-vrf)#route-target export 65000:101
Step 8: Configure vrf-1_Colo, vrf-2, and vrf-2_Colo to export and import from the Services2 VRF.
R1(config)#ip vrf vrf-1_Colo
R1(config-vrf)#route-target import 65000:102
R1(config-vrf)#route-target export 65000:102
!
R1(config)#ip vrf vrf-2
R1(config-vrf)#rd 65000:1002
R1(config-vrf)#route-target import 65000:102
R1(config-vrf)#route-target export 65000:102
!
R1(config)#ip vrf vrf-2_Colo
R1(config-vrf)#route-target import 65000:102
R1(config-vrf)#route-target export 65000:102
Verify the configuration
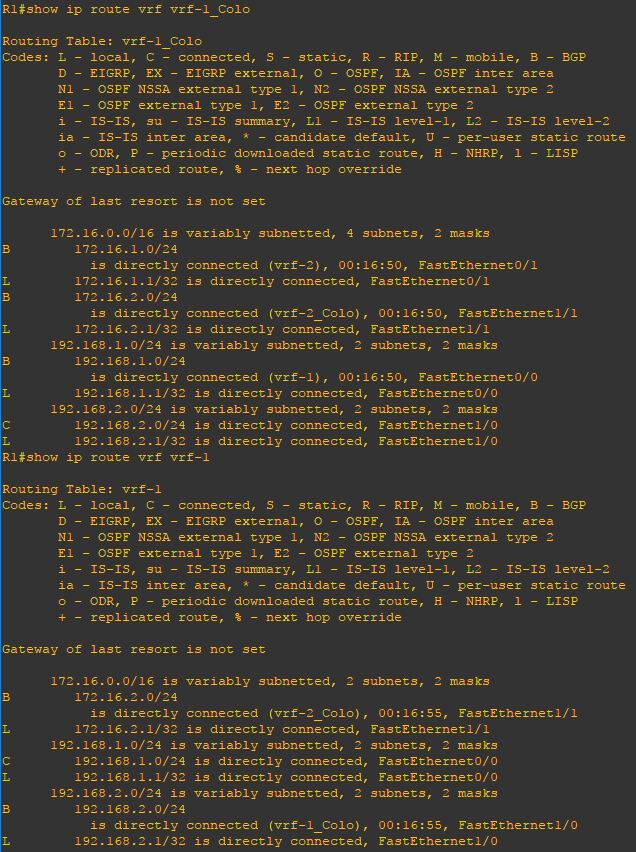
Now that the configuration is finished lets verify our VRF deployment. Using the show ip route vrf WORD, show ip vrf WORD commands on R1 you can verify the global and separate vrf routing tables as well as VPN routing/forwarding instance information. Notice VRF vrf-1_Colo has routes to all networks whereas vrf-1 only has routes to vrf-1_Colo and vrf-2_Colo.
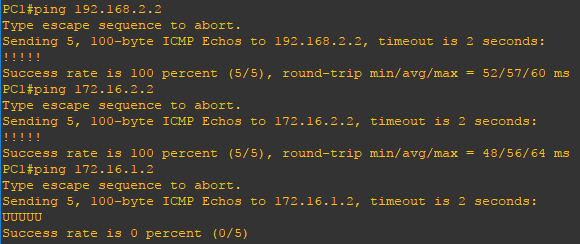
 With the appropriate import and export maps in place PC1 is able to reach vrf-1_Colo and vrf-2_Colo. Similarly PC2 is able to reach vrf-1_Colo and vrf-2_Colo and vrf-1_Colo and vrf-2_Colo are able to reach each other. However, vrf-1 and vrf-2 are unable to communicate with each other as expected.

