What is container management and why to use it?
A container management platform is a solution used to o create cloud-native, distributed applications and package legacy applications that were not originally designed for virtual environments. Container management software simplifies the process of adding or replacing containers when the need arises and facilitates the organization of large numbers of containers, automating much of the manual work. These platforms include orchestration, scheduling and storage functionality along with a Web-based UI to easily manage several aspects of container deployment. Some platforms are designed to function more effectively for small-scale testing and other, like the Rancher Container Management Platform, offer enterprise-grade networking and governance to securely manage containers in production across on-premises and cloud environments.
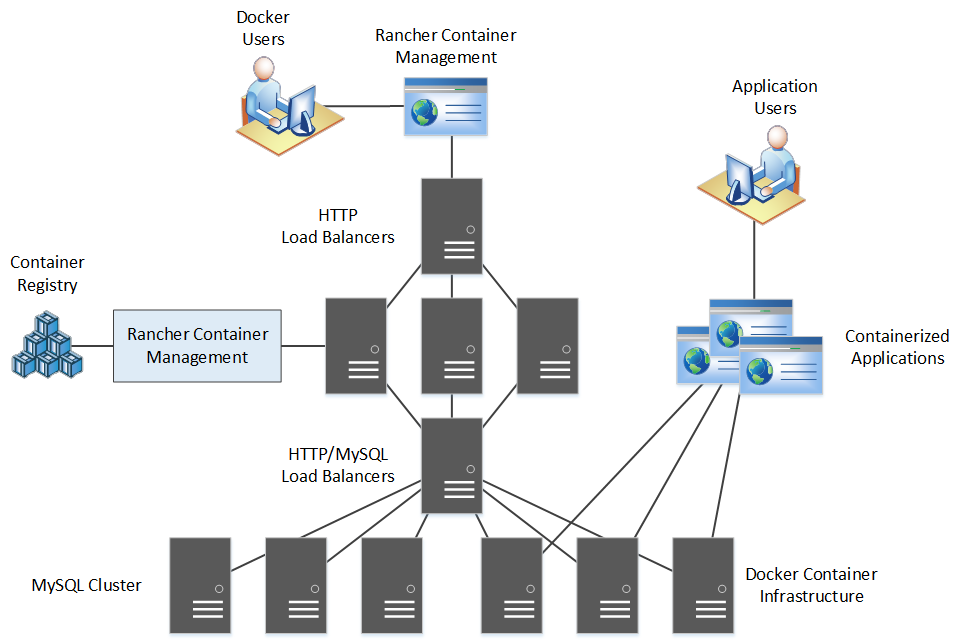
In this example we are going to deploy a total of two load balancers, three Rancher Container Management nodes in a High Availability deployment, three Docker hosts, and three MySQL hosts in a Galera cluster. All web request to Rancher will be will be sent to a load balancer IP and then distributed to each of the Rancher servers using a round robin policy. Similarly the Docker Container Hosts (DCH) will integrate into Rancher for management purposes and management communications are will be will be sent to a load balancer IP and then distributed to each of the Rancher servers using a round robin policy. Rancher will also communicate to the MySQL cluster using a load balancer in a similar fashion. The goal is to have multiple Rancher, Docker and MySQL nodes appear as one logical resource to protect again failure and ensure the Container Infrastructure will always be available.

Rancher prerequisites
Before we get started installing Rancher we need to take care of a few prerequisites for Rancher version 1.6.8. If the following items and conditions are not met the Rancher deployment may not be successful.
Step 1: The below MySQL queries will confirm which version of MySQL you are running and the table format. If your MySQL deployment does not meet the mentioned requirements below you can follow the guide I’ve written to Install MySQL Galera Cluster on Centos 7.
SHOW VARIABLES LIKE "%version%";
	+-------------------------+---------------------------------------------+
	| Variable_name           | Value                                       |
	+-------------------------+---------------------------------------------+
	| innodb_version          | 5.7.18                                      |
	| protocol_version        | 10                                          |
	| slave_type_conversions  |                                             |
	| tls_version             | TLSv1,TLSv1.1                               |
	| version                 | 5.7.18                                      |
	| version_comment         | MySQL Community Server - (GPL), wsrep_25.12 |
	| version_compile_machine | x86_64                                      |
	| version_compile_os      | Linux                                       |
	+-------------------------+---------------------------------------------+
	8 rows in set (0.01 sec)

mysql> SHOW VARIABLES LIKE 'innodb_file_format';
	+--------------------+-----------+
	| Variable_name      | Value     |
	+--------------------+-----------+
	| innodb_file_format | Barracuda |
	+--------------------+-----------+
	1 row in set (0.00 sec)
Step 2: Prepare two HAProxy load balancers, one to load balance MySQL connections from Rancher and one to load balance connections to Rancher. If you need help preparing load balancers I would suggest using HAProxy as it is easy to configure and manage. Here you can find guides for HTTP Load Balancing using HAProxy and MySQL Load Balancing using HAProxy
NOTE: The HAProxy load balancer represents a single point of failure. The HAProxy deployed as part of this guide is used for simplicity. It is recommended to use a clustered load balancer for both MySQL and HTTP connections such as a F5 or NGINX Plus Clustered load balancer.
Step 3: Prepare three Docker hosts to house one Rancher HA container each. Here you can find a guide for Installing Docker on Centos 7.
Steps to configure Rancher
[root@localhost ~]# mysql -u root -p 'mysql'
mysql> CREATE DATABASE IF NOT EXISTS cattle COLLATE = 'utf8_general_ci' CHARACTER SET = 'utf8';
mysql> GRANT ALL ON cattle.* TO 'cattle'@'%' IDENTIFIED BY 'cattle';
mysql> GRANT ALL ON cattle.* TO 'cattle'@'localhost' IDENTIFIED BY 'cattle';
mysql> FLUSH PRIVILEGES;
Step 5: Configure the HAProxy to use the backend Rancher servers we will deploy in a future step. Replace the listening IP with the load balancer IP, I.E. 10.62.0.90:8080. All connections will terminate for the Rancher instances to the load balancer and load balanced to the backend servers.
[root@localhost ~]# vi /etc/haproxy/haproxy.cfg

# Load Balancing for Rancher Cluster
listen rancher 10.1.0.1:8080
    balance roundrobin
    mode http
    option tcpka
    server rancl01 10.1.0.21:8080 check weight 1
    server rancl02 10.1.0.22:8080 check weight 1
    server rancl03 10.1.0.23:8080 check weight 1
Step 6: On each of your three Docker hosts run the following command to create a Rancher HA container. Each Rancher container should use the database that resides in the MySQL Cluster. As directed the cluster sits behind a load balancer with the IP address 10.1.0.1. For each Docker host the IP address 10.1.0.21 will be unique and specific to each Docker host.
[root@localhost ~]# docker run -d --restart=unless-stopped -p 8080:8080 -p 9345:9345 rancher/server \
     --db-host 10.1.0.1 --db-port 3306 --db-user cattle --db-pass cattle --db-name cattle \
     --advertise-address 10.1.0.21
Step 7: Login to Rancher for the first time and browse to Admin > Settings. Set the URL to 10.1.0.1 where 10.1.0.1 is the load balancer IP address or hostname answering HTTP request for Rancher.
Step 8: From the Rancher top pane menu browse to Infrastructure > Hosts, click Add Host, select Custom, and specify the IP address of one of the Docker host. Copy the script Rancher generated and run on each applicable Docker hosts. Below is a sample of the script.
[root@localhost ~]# docker run -e CATTLE_AGENT_IP="10.1.0.21" --rm --privileged -v /var/run/docker.sock:/var/run/docker.sock -v /var/lib/rancher:/var/lib/rancher rancher/agent:v1.2.6 http://10.1.0.1:8080/v1/scripts/BB92F6FEA95F50692A58:1483142400000:l58lEoC6p3ZAmfcE62MK7BRruk
Step 9: If any Docker host encounter a problem during setup run the below commands to cleanup the Rancher hooks into the Docker host and try again. You should also remove the host from Rancher as well by browsing to Infrastructure > Hosts.
[root@localhost ~]# docker stop $(docker ps -aq)
[root@localhost ~]# docker rm $(docker ps -aq)
[root@localhost ~]# docker rmi $(docker images -q)
[root@localhost ~]# rm -rf /var/lib/rancher/state
[root@localhost ~]# reboot
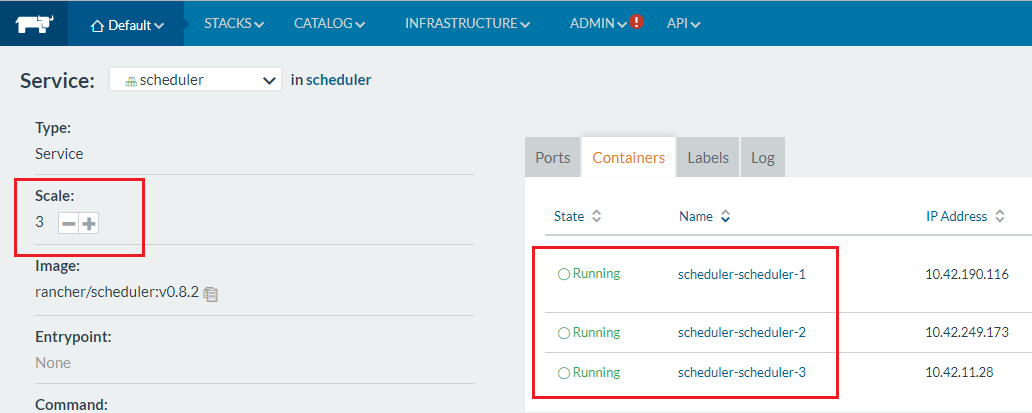
Step 10: From the Rancher top pane menu browse to Stacks > All. You will notice scheduler is only scaled to one container. Click on the scheduler stack once, and then once again. On the left hand pane you will have the ability to scale the stack further to ensure redundant scheduler containers are running on all three Docker container host also running Rancher.

Verify the configuration
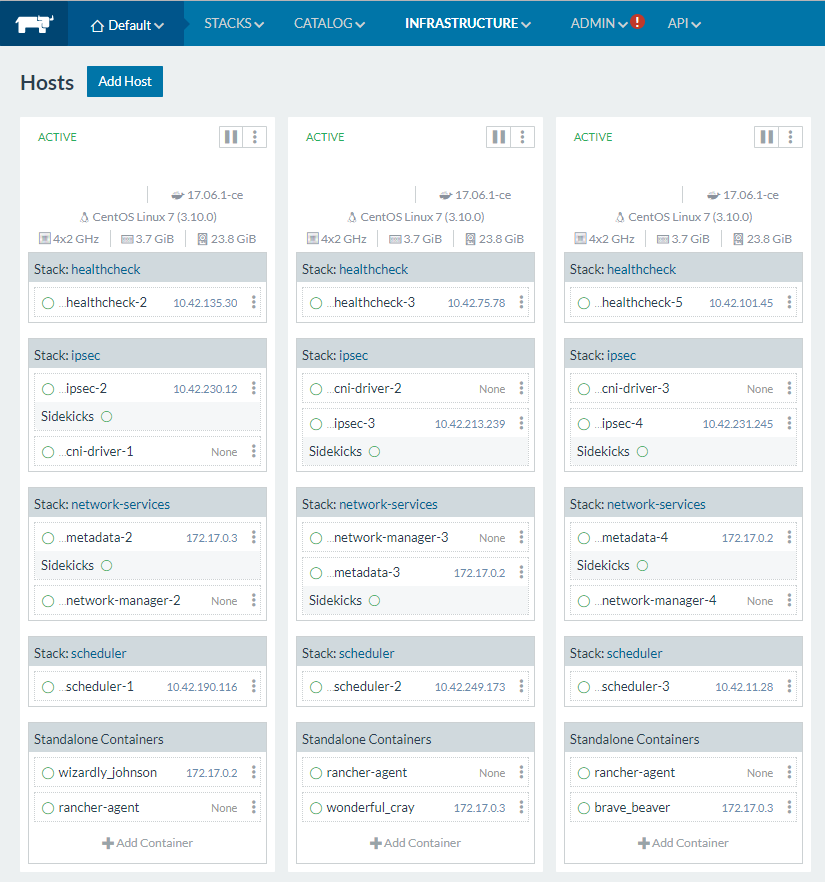
Now that the configuration is finished lets verify our Rancher and Docker deployment. From the Rancher top pane menu browse once again to Infrastructure > Hosts. Here you will see all three hosts listed which the same number of containers providing core Infrastructure services and each with a Rancher HA container. If any issues with one or more containers were present the Health Check services will throw and alarm here for one or more containers and/or the hosts.


