What are Docker containers and how to use them?
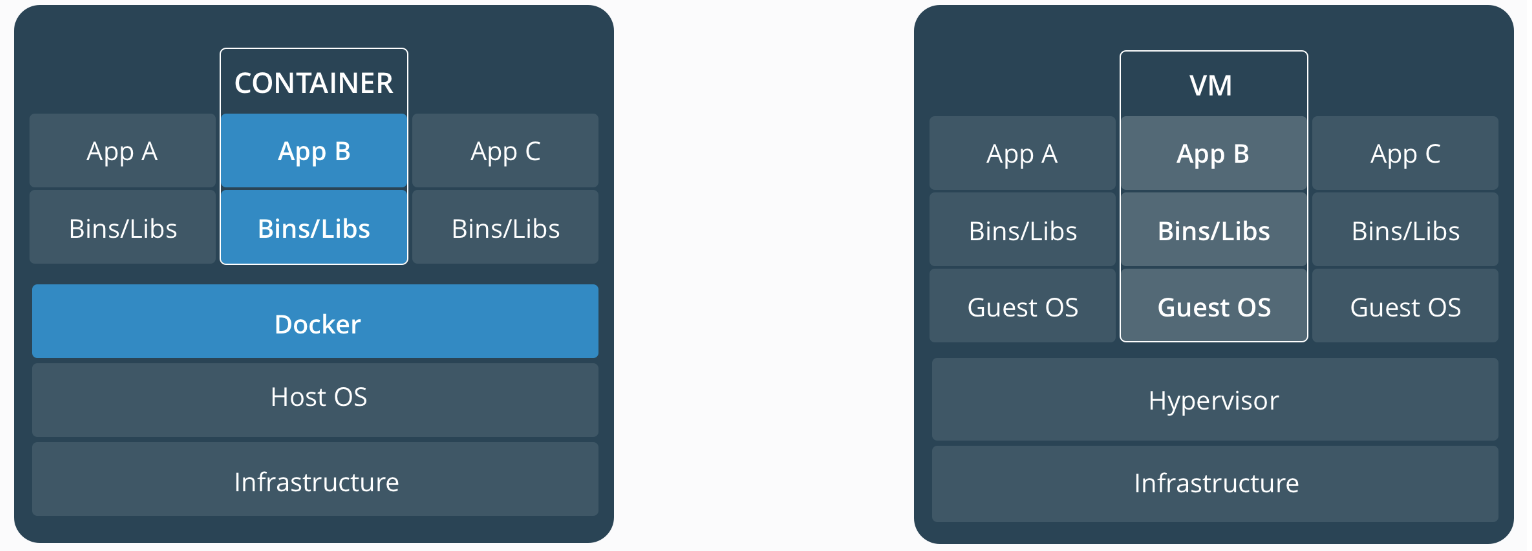
Docker is a software technology providing containers. Docker provides an additional layer of abstraction and automation of operating-system-level virtualization on Windows and Linux. Docker uses the resource isolation features of the Linux kernel such as cgroups and kernel namespaces, and a union-capable file system such as OverlayFS and others to allow independent “containers” to run within a single Linux instance, avoiding the overhead of starting and maintaining virtual machines (VMs). Containers are a way to package software in a format that can run isolated on a shared operating system.
Unlike VMs, containers do not bundle a full operating system – only libraries and settings required to make the software work are needed. This makes for efficient, lightweight, self-contained systems and guarantees that software will always run the same, regardless of where it’s deployed. Docker containers are based on open standards and run on all major Linux distributions, Microsoft Windows, and on any infrastructure including VMs, bare-metal and in the cloud. Docker containers also isolate applications from one another and from the underlying infrastructure.

Steps to configure a Docker container host
[root@localhost ~]# yum install yum-utils device-mapper-persistent-data, lvm2, firewalld
[root@localhost ~]# systemctl enable firewalld
[root@localhost ~]# systemctl start firewalld
Step 2: Use the following command to set up the stable repository.
[root@localhost ~]# yum-config-manager \
    --add-repo \
    https://download.docker.com/linux/centos/docker-ce.repo
Step 3: Update the yum package index and install the latest version of Docker CE.
[root@localhost ~]# yum makecache fast
[root@localhost ~]# yum install docker-ce
Step 4: Create a directory called “docker” to store a new file called daemon.json. Create it and add the following contents.
[root@localhost ~]# mkdir /etc/docker
[root@localhost ~]# vi /etc/docker/daemon.json

{
  "storage-driver": "devicemapper"
}
Step 5: Add the following contents to the sysctl.conf file.
[root@localhost ~]# vi /etc/sysctl.conf

net.bridge.bridge-nf-call-ip6tables = 1
net.bridge.bridge-nf-call-iptables = 1
Step 6: Enable the Docker service to start at boot and manually start the Docker service.
[root@localhost ~]# systemctl enable docker
[root@localhost ~]# systemctl start docker
Configure the block storage driver
[root@localhost ~]# ls /dev/sd*
/dev/sda  /dev/sda1  /dev/sda2
Step 8: Add a new disk to the VM, and reboot. Run the previous command again and make note of the new sdx entries. In our use case we added “/dev/sdb”.
[root@localhost ~]# ls /dev/sd*
/dev/sda  /dev/sda1  /dev/sda2 /dev/sdb
Step 9: Create a physical volume on your block device.
[root@localhost ~]# pvcreate /dev/sdb
Step 10: Create a volume group using the raw disk.
[root@localhost ~]# vgcreate docker /dev/sdb
Volume group "docker" successfully created
Step 11: Create two logical volumes for Docker to use.
[root@localhost ~]# lvcreate --wipesignatures y -n thinpool docker -l 95%VG
 Logical volume "thinpool" created.
[root@localhost ~]# lvcreate --wipesignatures y -n thinpoolmeta docker -l 1%VG
 Logical volume "thinpoolmeta" created.
Step 12: Convert the volumes to a thin pool and a storage location for metadata for the thin pool.
[root@localhost ~]# lvconvert -y \
 --zero n \
 -c 512K \
 --thinpool docker/thinpool \
 --poolmetadata docker/thinpoolmeta

 WARNING: Converting logical volume docker/thinpool and docker/thinpoolmeta to thin pool's data and metadata volumes with metadata wiping.
 THIS WILL DESTROY CONTENT OF LOGICAL VOLUME (filesystem etc.)
 Converted docker/thinpool to thin pool.
Step 13: Create a autoextension of thin pools via an lvm profile. The example below will add 20% more capacity when the disk usage reaches 80%.
[root@localhost ~]# vi /etc/lvm/profile/docker-thinpool.profile

activation {
  thin_pool_autoextend_threshold=80
  thin_pool_autoextend_percent=20
}
Step 14: Apply the LVM profile, using the lvchange command.
[root@localhost ~]# lvchange --metadataprofile docker-thinpool docker/thinpool
 Logical volume docker/thinpool changed.
Step 15: Enable monitoring for logical volumes on your host. Without this step, automatic extension will not occur even in the presence of the LVM profile.
[root@localhost ~]# lvs -o+seg_monitor
 LV VG Attr LSize Pool Origin Data% Meta% Move Log Cpy%Sync Convert Monitor
 root centos -wi-ao---- 13.87g
 swap centos -wi-ao---- 1.60g
 thinpool docker twi-a-t--- 475.00g 0.00 0.01 monitored
Step 16: Since we have run Docker on this host before, stop Docker and move the contents of /var/lib/docker/ so that Docker can use the new LVM pool to store the contents of image and containers.
[root@localhost ~]# systemctl stop docker
[root@localhost ~]# mkdir /var/lib/docker.bk
[root@localhost ~]# mv /var/lib/docker/* /var/lib/docker.bk
Step 17: Edit /etc/docker/daemon.json and configure the options needed for the devicemapper storage driver. The file should now contain the below contents.
[root@localhost ~]# vi /etc/docker/daemon.json

{
    "storage-driver": "devicemapper",
    "storage-opts": [
    "dm.thinpooldev=/dev/mapper/docker-thinpool",
    "dm.use_deferred_removal=true",
    "dm.use_deferred_deletion=true"
    ]
}
NOTE: If you use Docker RHEL, CentOS, or Oracle Linux, you must use the devicemapper storage driver.
Step 18: Start the Docker service.
[root@localhost ~]# systemctl start docker
Verify the configuration
Step 19: Run the hello-world container to verify Docker is functional.
[root@localhost ~]# docker run hello-world

Hello from Docker!
This message shows that your installation appears to be working correctly.
Step 20: Run the docker info command to confim the devicemapper storage drive is used, the pool is not the loopback, and the size of the disk attached.
[root@localhost ~]# docker info
Containers: 1
 Running: 0
 Paused: 0
 Stopped: 1
Images: 1
Server Version: 17.06.1-ce
Storage Driver: devicemapper
 Pool Name: docker-thinpool
 Pool Blocksize: 524.3kB
 Base Device Size: 10.74GB
 Backing Filesystem: xfs
 Data file:
 Metadata file:
Step 21: Finally, remove stopped docker containers.
[root@localhost ~]# docker ps -aq --no-trunc | xargs docker rm
9d2b29000272ab03c338d062d98a83234a5edfe282f4f01780f963ec01104929

