What is HAProxy Server and how to use it?
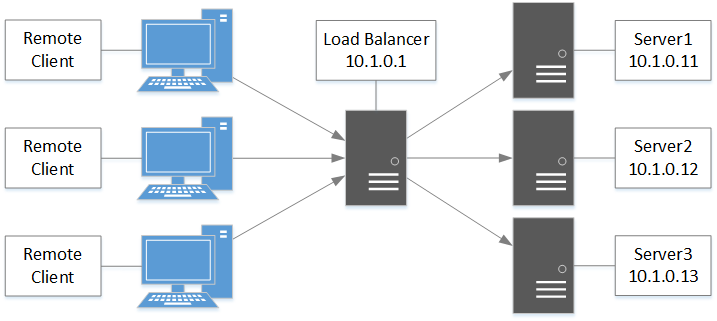
HAProxy is a free, very fast and reliable solution offering high availability, load balancing, and proxying for TCP and HTTP-based applications. It is particularly suited for very high traffic web sites and powers quite a number of the world’s most visited ones. Over the years it has become the de-facto standard opensource load balancer and is now shipped with most mainstream Linux distributions. Its most common use is to improve the performance and reliability of a server environment by distributing the workload across multiple servers (e.g. web, application, database).
In the example below we will configure one HAProxy server to load balance traffic to three back-end apache web servers and perform basic health checks by establishing a connection with the back-end nodes to determine if the nodes are operational.

Steps to configure a HAProxy server
[root@localhost ~]# yum -y install haproxy
Step 2: Run the setsebool utility to enable or disable Booleans. Booleans allow parts of SELinux policy to be changed at runtime to allow services access to use certain ports without reloading or recompiling the SELinux policy.
[root@localhost ~]# setsebool -P haproxy_connect_any=1
Step 3: Configure the haproxy.cfg file to include the below.
[root@localhost ~]# vi /etc/haproxy/haproxy.cfg

# Load Balancing for apache web farm
listen apache 10.1.0.1:80
    balance roundrobin
    mode http
    option tcpka
    server web01 10.1.0.11:80 check weight 1
    server web02 10.1.0.12:80 check weight 1
    server web03 10.1.0.13:80 check weight 1
Step 4: Enable the haproxy service to start at boot and start immediately.
[root@localhost ~]# systemctl enable haproxy
[root@localhost ~]# systemctl start haproxy
Step 5: Use the below command to create a PHP file to display the server’s IP address when visiting http://10.1.0.1/info.php. Below is a snipet of the php code that needs to go in the file.
[root@localhost]# vi /var/www/html/info.php

<?php
echo $_SERVER['SERVER_ADDR'];
?>
Verify the Configuration
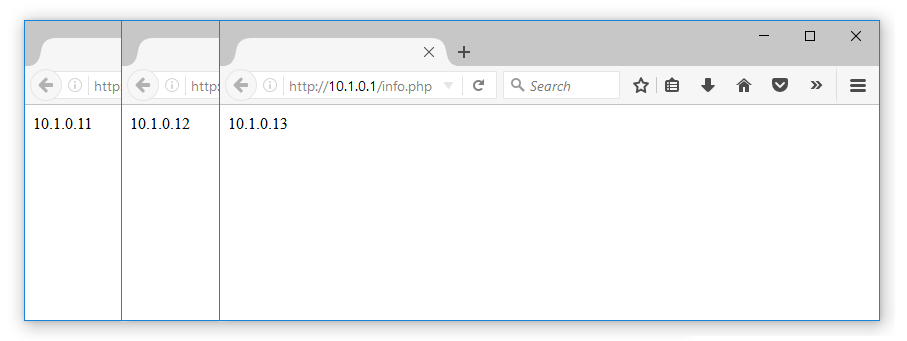
Now that the configuration is finished lets verify our load balancing deployment. Using a web browser of chouce visit http://10.1.0.1/info.php. You will now see the web server’s IP address. Upon each refresh of the page the IP address should round-robin between the back-end web servers.


