What is inter-vlan routing and why to use it?
Inter-vlan routing is defined as a process of forwarding network traffic from one vlan to another vlan using a router or layer 3 device. To facilitate inter-vlan routing a router must be connected to the switching infrastructure or the switch must support layer 3 routing locally. For each vlans to be routable locally on a switch each vlan must be assigned a unique IP on the network. Alternatively if using a router the router can have multiple interfaces with each connected to a vlan or the router can be configured with tagged vlan sub-interfaces (router on a stick).
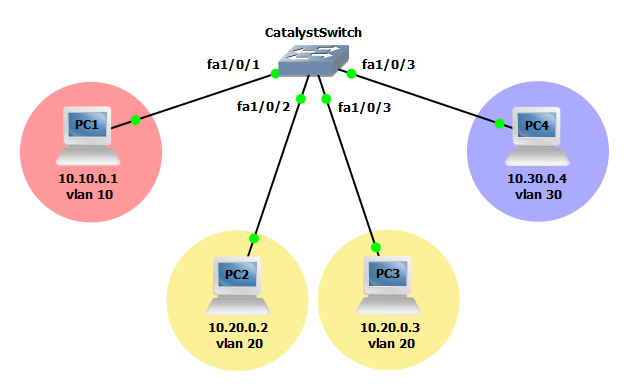
In the example below we will configure a single switch with three vlans, 10, 20, and 30. Each port configured on the switch will be configured as access ports unconditionally allowing only a single device to be connected. All devices within a vlan should be able to access other devices in the same vlan. Devices connected to ports in other vlans should only be able to access other devices external to the same vlan if configured with a switch virtual interface (SVI).

Steps to configure inter-vlan routing
Switch(config)#vlan 10,20,30
Step 2: Configure switch interfaces as access ports and assign specific interfaces access to vlans 10, 20, and 30.
Switch(config)#interface FastEthernet1/0/1
Switch(config-if)# switchport mode access
Switch(config-if)# switchport access vlan 10
!
Switch(config)#interface range FastEthernet1/0/2-3
Switch(config-if-range)#switchport mode access
Switch(config-if-range)#switchport access vlan 20
!
Switch(config)#interface FastEthernet1/0/4
Switch(config-if-range)#switchport mode access
Switch(config-if-range)#switchport access vlan 30
Step 3: Configure switch virtual interfaces (SVIs) for vlan 20 and 30 only by assigning an IP address to the applicable vlans and issue the no shut command.
Switch(config)#int vlan 20
Switch(config-if)#ip add 10.20.0.1 255.255.255.0
Switch(config-if)#no shut
!
Switch(config)#int vlan 30
Switch(config-if)#ip add 10.30.0.1 255.255.255.0
Switch(config-if)#no shut
Step 4: Configure inter-vlan routing by enabling IP routing on the local switch.
Switch(config)#ip routing
Verify the configuration
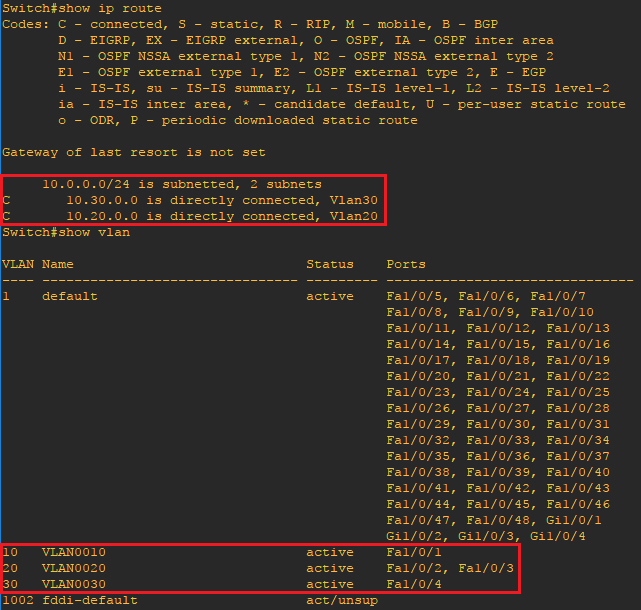
Now that the configuration is finished lets verify the vlan assignments. Using the show vlan, show ip route and show ip int brief commands you can verify each vlan in the local vlan database, the local routing table and the IP configuration of each vlan SVI. By viewing the local vlan database you can also verify which ports have been assigned to each vlan. Use the ping command to verify connectivity within a vlan. You should now be able to ping computers in other vlans configured with SVIs, however, computers in vlans without SVIs should remain unreachable.

