What is MySQL cluster and how to use it?
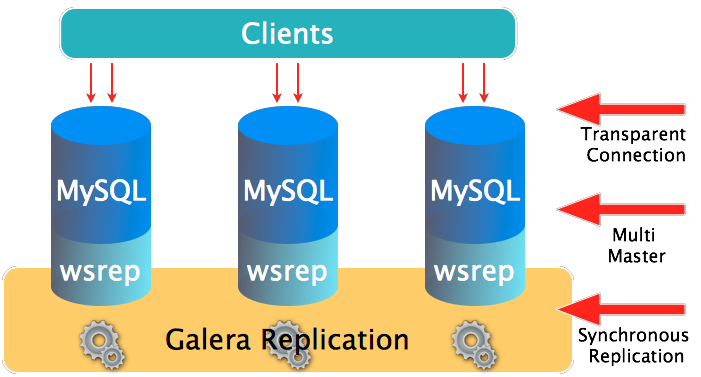
MySQL Galera Cluster is a synchronous multi-master cluster, available on Linux only, and only supports the XtraDB/InnoDB storage engines . It is designed to provide high availability and high throughput with low latency, while allowing for near linear scalability. MySQL Cluster is implemented through the NDB or NDBCLUSTER storage engine for MySQL ("NDB" stands for Network Database). MySQL features include: synchronous replication, active-active multi-master topology, read and write to any cluster node, automatic membership control, parallel replication on row level, and direct client connections. These features yield several benefits for a DBMS clustering solution, including: no slave lag, no lost transactions, both read and write scalability, and smaller client latencies.
Steps to configure a MySQL Cluster
Step 1: Enabling the Galera Cluster yum repositories.
[root@localhost ~]# vi /etc/yum.repos.d/galera.repo

[galera]
name = Galera
baseurl = http://releases.galeracluster.com/galera-3/centos/7/x86_64/
gpgkey = http://releases.galeracluster.com/GPG-KEY-galeracluster.com
gpgcheck = 1

[mysql-wsrep]
name = MySQL-wsrep
baseurl =  http://releases.galeracluster.com/mysql-wsrep-5.7.18-25.12/centos/7/x86_64/
gpgkey = http://releases.galeracluster.com/GPG-KEY-galeracluster.com
gpgcheck = 1
Step 2: Install Galera and the prerequisite packages.
[root@test-dev-mysql01 ~]# yum -y install galera-3 mysql-wsrep-5.7 rsync lsof policycoreutils-python firewalld
Step 3: Enable the Galera service to start at boot, but do not start the service just yet.
[root@localhost]# systemctl enable mysqld
Step 4: Start the firewalld service and enable the service to start at boot.
[root@localhost ~]# systemctl enable firewalld
[root@localhost ~]# systemctl start firewalld
Step 5: Configure firewall exceptions to allow both replication and remote MySQL connections and reload the firewall.
[root@localhost ~]# firewall-cmd --zone=public --add-service=mysql --permanent
[root@localhost ~]# firewall-cmd --zone=public --add-port=3306/tcp --permanent
[root@localhost ~]# firewall-cmd --zone=public --add-port=4444/tcp --permanent
[root@localhost ~]# firewall-cmd --zone=public --add-port=4567/tcp --permanent
[root@localhost ~]# firewall-cmd --zone=public --add-port=4567/udp --permanent
[root@localhost ~]# firewall-cmd --zone=public --add-port=4568/tcp --permanent
[root@localhost ~]# firewall-cmd --reload
Step 6: Configure SELinux to permissive mode for MySQL.
[root@localhost]# semanage port -a -t mysqld_port_t -p tcp 4567
[root@localhost]# semanage port -a -t mysqld_port_t -p udp 4567
[root@localhost]# semanage port -a -t mysqld_port_t -p tcp 4568
[root@localhost]# semanage port -a -t mysqld_port_t -p tcp 4444
[root@localhost]# semanage permissive -a mysqld_t
NOTE: Some of the SELinux policies may already be defined.
Step 7: Make a backup of the my.cnf file and then edit the file to include the below.
[root@localhost]# cp /etc/my.cnf /etc/my.cnf.bak
[root@localhost]# vi /etc/my.cnf

[mysqld]
datadir=/var/lib/mysql
socket=/var/lib/mysql/mysql.sock
user=mysql
binlog_format=ROW
bind-address=0.0.0.0
default_storage_engine=innodb
innodb_autoinc_lock_mode=2
innodb_flush_log_at_trx_commit=0
innodb_buffer_pool_size=122M
wsrep_provider=/usr/lib64/galera-3/libgalera_smm.so
wsrep_provider_options="gcache.size=300M; gcache.page_size=300M"
wsrep_cluster_name="galera_cluster1"
wsrep_cluster_address="gcomm://10.1.0.11:3306,10.1.0.12:3306,10.1.0.13:3306"
wsrep_sst_method=rsync
server_id=1
wsrep_node_address="10.1.0.11"
wsrep_node_name="mysql01"

[mysql_safe]
log-error=/var/log/mysqld.log
pid-file=/var/run/mysqld/mysqld.pid
Step 8: Create the mysqld.log and give the mysql account the appropriate permissions.
[root@localhost]# touch /var/log/mysqld.log
[root@localhost]# chown mysql:mysql /var/log/mysqld.log
Step 9: Repeat the above steps on each MySQL node that will participate in the MySQL Cluster. Be sure to alter the below fields in the /etc/my.cnf file to reflect the correct IP address and hostname that is applicable to each node.
server_id=1
wsrep_node_address="10.1.0.11"
wsrep_node_name="mysql01"
Starting MySQL Cluster for the first time
Step 10: Start the MySQL on the first node, mysql01.
[root@localhost]# /usr/bin/mysqld_bootstrap
Step 11: After you installed MySQL 5.7 you will need to find the temporary password from /var/log/mysqld.log to login as root.
[root@localhost]# grep 'temporary password' /var/log/mysqld.log
2017-08-31T12:36:15.644109Z 1 [Note] A temporary password is generated for root@localhost: passwordhere
Step 12: Improve the MySQL installation security by running the command below. Take all of the default which are the most secure. You will also be asked to change the MySQL root password which is recommended you change.
[root@localhost]# /usr/bin/mysql_secure_installation
NOTE: The root password should be a well-documented password and should not match the root user password of the Linux system.
Step 13: Login to MySQL and run the below query to confirm the number of nodes in the cluster.
[root@localhost]# mysql -u root -p

mysql> SHOW STATUS LIKE 'wsrep_cluster_size';
+--------------------+-------+
| Variable_name      | Value |
+--------------------+-------+
| wsrep_cluster_size | 1     |
+--------------------+-------+
1 row in set (0.00 sec)
Step 14: Start MySQL on the other member nodes, mysql02 and mysql03. Notice the command to start the MySQL service is different on subsequent member nodes.
[root@localhost]# systemctl start mysqld
Step 15: Login to MySQL and run the below query again to confirm the number of nodes in the cluster has increased.
[root@localhost]# mysql -u root -p

mysql> SHOW STATUS LIKE 'wsrep_cluster_size';
+--------------------+-------+
| Variable_name      | Value |
+--------------------+-------+
| wsrep_cluster_size | 3     |
+--------------------+-------+
1 row in set (0.00 sec)
Verify the Configuration
Step 16: Confirm port 4567 is actively listening for replication connections.
[root@localhost ~]# lsof -i:4567
COMMAND  PID  USER   FD   TYPE DEVICE SIZE/OFF NODE NAME
mysqld  2958 mysql   12u  IPv4  68974      0t0  TCP *:tram (LISTEN)
Step 17: Confirm port 3306 is actively listening for MySQL connections.
[root@localhost ~]# lsof -i:3306
COMMAND  PID  USER   FD   TYPE DEVICE SIZE/OFF NODE NAME
mysqld  2958 mysql   39u  IPv4  68990      0t0  TCP *:mysql (LISTEN)
Step 18: Test replication by creating a new database on one node and then verify the database is replicated to other nodes. Use the below query on the source node used to create the database and on member nodes to verify replication.
[root@localhost]# mysql -u root -p

mysql> create database galera_test;
Query OK, 1 row affected (0.00 sec)

mysql> show databases;
+--------------------+
| Database           |
+--------------------+
| information_schema |
| galera_test        |
| mysql              |
| performance_schema |
| sys                |
+--------------------+
5 rows in set (0.01 sec)
Step 19: Shutdown mysql01 and check the cluster size from one of the member nodes.
mysql> SHOW STATUS LIKE 'wsrep_cluster_size';
+--------------------+-------+
| Variable_name      | Value |
+--------------------+-------+
| wsrep_cluster_size | 2     |
+--------------------+-------+
1 row in set (0.00 sec)
Step 20: Bring mysql01 back online and confirm all three nodes are connected.
mysql> SHOW STATUS LIKE 'wsrep_cluster_size';
+--------------------+-------+
| Variable_name      | Value |
+--------------------+-------+
| wsrep_cluster_size | 3     |
+--------------------+-------+
1 row in set (0.00 sec)
Step 21: Confirm all three node IPs are listed in wsrep_incoming_addresses. Disconnected nodes are removed from replication automatically.
mysql> SHOW STATUS LIKE 'wsrep%';
+------------------------------+----------------------------------------------------+
| Variable_name                | Value                                              |
+------------------------------+----------------------------------------------------+
| wsrep_incoming_addresses     | 10.1.0.11:3306,10.1.0.12:3306,10.1.0.13:3306       |
+------------------------------+----------------------------------------------------+
Step 22: The below query will confirm which version of MySQL you are running.
mysql> SHOW VARIABLES LIKE "%version%";
+-------------------------+---------------------------------------------+
| Variable_name           | Value                                       |
+-------------------------+---------------------------------------------+
| innodb_version          | 5.7.18                                      |
| protocol_version        | 10                                          |
| slave_type_conversions  |                                             |
| tls_version             | TLSv1,TLSv1.1                               |
| version                 | 5.7.18                                      |
| version_comment         | MySQL Community Server - (GPL), wsrep_25.12 |
| version_compile_machine | x86_64                                      |
| version_compile_os      | Linux                                       |
+-------------------------+---------------------------------------------+
8 rows in set (0.01 sec)
Step 23: The below query will confirm which format is the default on the MySQL Server.
mysql> SHOW VARIABLES LIKE 'innodb_file_format';
+--------------------+-----------+
| Variable_name      | Value     |
+--------------------+-----------+
| innodb_file_format | Barracuda |
+--------------------+-----------+
1 row in set (0.00 sec)
Complete cluster shutdown and restart
Step 24: In the event of a total shutdown of a MySQL Cluster nodes will not start automatically. The first step to restarting the cluster is to find which node has the safe_to_bootstrap set to 1 in the grastate.dat file.
[root@localhost ~]# cat /var/lib/mysql/grastate.dat

# GALERA saved state
version: 2.1
uuid:    a403c026-8e57-11e7-9cba-43155149803a
seqno:   -1
safe_to_bootstrap: 1
Step 25: On the MySQL node with safe_to_bootstrap set to 1 start MySQL with the below command.
[root@localhost]# /usr/bin/mysqld_bootstrap
Step 26: After the initial node is started start the remaining nodes with the below command. Notice the command to start the MySQL service is different on subsequent member nodes.
[root@localhost]# systemctl start mysqld
Step 27: Login to MySQL and run the below queries again to confirm all three nodes are online.
[root@localhost]# mysql -u root -p

mysql> SHOW STATUS LIKE 'wsrep_cluster_size';
+--------------------+-------+
| Variable_name      | Value |
+--------------------+-------+
| wsrep_cluster_size | 3     |
+--------------------+-------+
1 row in set (0.00 sec)

mysql> SHOW STATUS LIKE 'wsrep%';
+------------------------------+----------------------------------------------------+
| Variable_name                | Value                                              |
+------------------------------+----------------------------------------------------+
| wsrep_incoming_addresses     | 10.1.0.11:3306,10.1.0.12:3306,10.1.0.13:3306       |
+------------------------------+----------------------------------------------------+